
Lino-Cutting Tips
An Artist is Only as Good as His Tools
If you've got a set of those plasticky things they torture GCSE art students with chuck them away. Cheap tools are potentially dangerous; badly designed handles reduce control and blunt blades skid through lino unpredictably. They also make for disappointing results and disaffected students.
See our Where can I find... Lino Cutting, Wood Cutting & Engraving tools and supplies page for the best suppliers.
Good tools last a lifetime or more, will improve with judicious sharpening, and retain value on the second hand market (so you could eBay them if crisis strikes!).
Don't be Conned Into Buying the Whole Range
Three or four is enough for most people, at least to start with. If you're using a press, the size of your lino-cuts will be restricted to suit the machine so choose tools to scale. There's no point having a tool the size of a spade if you've got an Adana 5 x 3.
Soften with Linseed Oil
Put a drop of linseed oil on a rag and rub it over the surface of your lino. It's traditionally thought to keep the lino supple. Do this before you warm the lino, and it'll sink in nicely.
Heat Your Lino Gently to Make it Easier to Work With
Don't get it too hot or it will warp badly; try holding it over a light-bulb (not a fluorescent one!), put it near a radiator, in bright sunshine (if you live in a country so blessed) or try a hair drier on a low/medium heat setting.
Artist Audrey James uses her work lamp to keep the lino warm as she works, bringing the lamp closer to the lino for fine detail.
Your tools will glide through the lino, it won't tear with jagged edges and you can create finer detail. You'll notice as soon as the effects wear off, and you'll wonder why no one told you about warm lino before!
Rub a Little White Watercolour Paint Over the Surface
This creates a greater contrast between the printing surface and the cut-away areas, so it's easier to see what you're doing. Wipe it off with a damp cloth when you've finished.
Cut Deeper for Letterpress
If you're used to printing with a hand-roller, the back of a spoon or a proofing press, you'll almost certainly need to cut your lino deeper to get a good print with a proper press, because of the increased pressure. Otherwise the white space will start to take ink and your fine detail will fill up, especially on longer runs. For the same reason, don't buy thin lino!
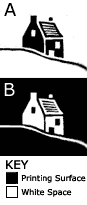 How deep should you cut? In solid areas of your design, as in Fig B, you can cut quite shallow details (as little as 3pt deep, for the finest detail) because there's plenty of lino around it to bear the pressure. If you've got a large area of white space with a few spots of detail, as in Fig A, you need to cut at least twice as deep to prevent the cut-away area from printing.
Large areas of white space should be cut as deep as possible without going through to the backing, especially around the edges of the lino (the edges which the rollers hit first and last need extra attention).
If you want to save the detail in an existing lino-cut, and cutting deeper isn't an option, you can take a print (it must be in black ink on bright white paper) with your trusty spoon, and get it made into a nylon block (or metal if the detail is exceptionally fine) for reproduction on a grander scale.
Mount with 2" Double Sided Tape
Double sided tape can be removed with minimal damage and, with a bit of luck, you'll be able to reuse both mount and lino-cut.
- Stick the tape onto the back of the lino, butting up the edges evenly to prevent bumpy overlaps (use the widest tape you can get) and trim round.
- Turn the lino the right way up and press down firmly to get rid of any air bubbles in the tape underneath.
- Peel off the backing and press firmly onto your mount.
- Obstinate bubbles can be prodded with a pin!
You'll find more detail in the Getting Started... Block Mounting guide.
When All Else Fails, Make a Block
It happens to everyone; you've almost finished and then, with one slip of your hand, someone's lost an ear. Or a leg. Whilst some accidents can be incorporated into the design, some seem heart-breakingly final.
Unless the damaged area is separated from the rest of your design by lots of white space, don't listen to anyone who tells you to cut around the mistake and insert a new piece of lino into the hole. This can be done, but doing it well is a lot harder than it sounds. You're very likely to ruin the whole thing. So why not take a print (black ink/white paper), fill in the gap in the proof with indian ink and have a nylon block made? It's not quite the same as the ‘real’ thing, but needs must!
You Might Also Like...